
I grew up in a house where birthday cakes never came from boxes and pie crusts were always made from scratch. So it's only natural that I'm one of those bakers who doesn't believe in premade pie crusts. In my opinion, they're for lazy people. Yeah, I said it. If you're going to make a pie, you take an extra 10 minutes to make a pie crust, too. Or else when someone tells you how pretty it is, or how delicious it tastes, you have to admit that you didn't actually make the crust. It's only fair. Premade pie crusts taste like cardboard, anyway. I don't know why people still buy those things. [END RANT]
This has been my go-to pie crust recipe for the past couple of years. Something about the combination of butter and shortening makes this a perfectly flaky, flavorful crust. And duh, the hand pies we're totally inspired by Deb. Had it not been for her, these things would have been shaped like mini empanadas and not nearly as cute. And I know, shame on me for not getting a shot of the pumpkin innards. But you're all smart folks - you can imagine what a bite out of one of these things might look like, right? Besides, I'm not a fan of biting into something I can't swallow. Have you ever done that? It's terrible.
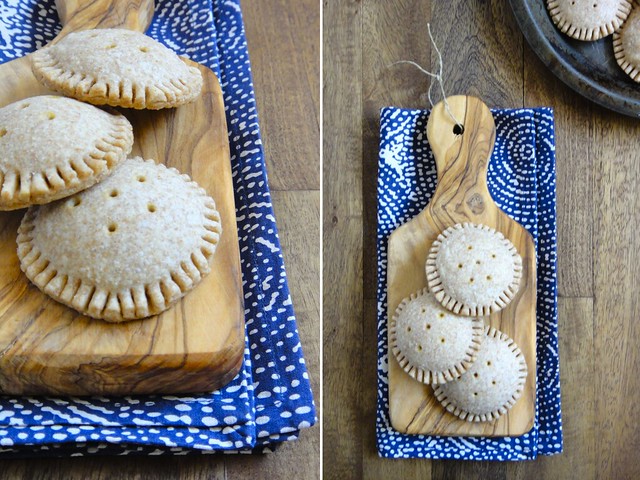
PUMPKIN HAND PIES
1 1/2 c. unbleached flour
1 c. whole wheat flour
1 tbsp cane sugar
1/2 tsp fine sea salt
1/2 c. vegan butter, cold
1/2 c. shortening, cold
6-8 tbsp water, ice coldFilling
3/4 c. pumpkin puree
1/4 c. cane sugar
1/2 tsp pure unsulphured molasses
1/2 tsp pure vanilla extract
1/2 tsp pumpkin pie spice
Pinch of salt
In a large bowl, stir together the flours, sugar and salt. Using a pastry cutter, or two knives, cut the butter and shortening into the flour mixture. You could also do this in your food processor, or so I hear. Stick the bowl into the freezer for 15-20 minutes to get the ingredients cold. Once chilled, add water 1 tablespoon at a time; knead the dough. I've achieved smooth dough with only 6 tablespoons of water, but depending on the weather, you may need to use 8. Once all of the water's been added, knead the dough for a minutes then divide it in half, pat into smooth discs, wrap with plastic and refrigerate for at least 60 minutes.
In a small bowl, stir together the pumpkin puree, sugar, molasses and vanilla extract. Sift in the pumpkin pie spice and salt. Chill in fridge until the dough is ready to be used. Depending on the thickness of your pumpkin puree, you may need to sift in a few tablespoons of flour once it's finished chilling. I've noticed canned puree tends to be much thinner than homemade puree.Yield: 16-18 3" pies
Preheat oven to 350˚F. Line a flat surface with parchment paper and lightly sprinkle with flour. Remove one of the discs of dough from the fridge and roll it out until it is 1/8" thick - the thinner, the better. Using a round 3" cookie cutter, cut the dough and transfer the rounds to a baking sheet lined with a silicon mat or parchment paper. Repeat with second batch of dough. Place about 1 tablespoon of the pumpkin mixture onto half of the rounds, then sandwich with the other half; gently press along the edges to seal then chill in the freezer for 15-20 minutes. Once chilled, use a fork to press the edges of each round. You must press them completely through or else the filling will seep out during baking. Trim the unsightly edges with a pair of scissors. Using a toothpick, prick holes in the top of each pie (if you don't do this, they will probably explode). Bake at 350˚F for 20 minutes. Transfer to cooling rack and store in an air tight container for up to five days.

I'm envious! I grew up in a house were everything regarding food was the opposite. Somehow I managed to turn out very different than my family members. I agree with you: homemade is always superior. Store-bought crusts (and anything else, really) just can't compare.
ReplyDeleteOh dear my imagination isn't good though. I'll just have to make these, too and find out how they look that way!
Oh so pretty. And yes I agree homemade is always better and by buying ready made you miss out on all the fun of baking or cooking!
ReplyDeleteBeautiful!!! You put my baking skills to shame. Like Alicia, I grew up in a home where pretty much all baked goods were store-bought. My mom, god love her, isn't much of a cook or baker. I'm trying to break the curse. ;)
ReplyDeleteI don't know what the innards look like therefore I cannot eat said pumpkin hand pies :P Okay seriously though. Seriously. Seriously? Pllleeeeeaaaaasssssseee come over and make me everything you put up on your blog! I'm serious. Did I mention seriously?! You are perfection.
ReplyDeleteso cute! And I bet the double crust cuts down on the richness factor. Thanks for the recipe!!
ReplyDeleteohh, these are cute! I love hand pies.
ReplyDeleteaaaaaaaaah, so adorable!
ReplyDeleteFunny thing is, I made a mini pie today too. But now mine just seems like nothing in comparison. Nothing!
ReplyDeleteaha, oh well. The chia seed crust looked weird anyway.
These look wonderful though, really. Doesn't baking all of this food that you can't eat drive you crazy?
I love this so much. <3 Inspiring!
ReplyDeleteWow, I'm going to make these :)
ReplyDeleteOnly TEN comments??? Absurd. This blog deserves to have a million for each post!!! Have I told you lately that I love your blog? :) And did I just sound like I was singing a Rod Stewart song to you? Good. Love ya grandma... ha!
ReplyDeleteGorgeous! I can't wait to try to make these gluten-free. I love handpies but they are so much work. Maybe I'll get better at it with more practice...
ReplyDeletethese are adorable, I think I may try making these for halloween : )
ReplyDeleteThose are SO CUTE! OMG! Between these and the above scones, I am won over by your blog. :)
ReplyDeletethis is my new favorite blog. i love pumpkin everything! amazing photography and the presentation is PERFECT
ReplyDeleteThey're in the oven... We'll see how it goes!!! I have a feeling this is going to be a trial and error sort of thing with the crust. Is it like sugar cookies where you roll up the excess dough and make another ball and roll it out again and cut more crusts? I sure hope so because that's what I did! But I still have a lot of trimmed bits of dough that I assume are now trash. I feel wasteful!
ReplyDeleteYes, but I stick to the rule of only rolling out the dough once. If you do it more, you alter the flour content a great deal (assuming you floured the surface). Just make sure you cut the rounds as close together as possible - literally touching.
Delete